Ever wondered how professional painters… well, paint portraits? Or have you ever wanted to learn how to paint professional portraits yourself?
Today’s your lucky day. And… gosh, I’m so excited for this!
Now, for those of you who I may not have met yet… hey there; I’m Kari Lynn M., a professional artist who loves to paint! I also happen to love talking about painting… which is why I’m here, today, to share some top-secret portrait painting tips with you.
Totally top-secret, I promise.
Because portrait painting is often looked at as if it were this colossal, unachievable mountain summit that can never be reached, especially for beginning artists. However… listen, guys, it’s actually not that hard.
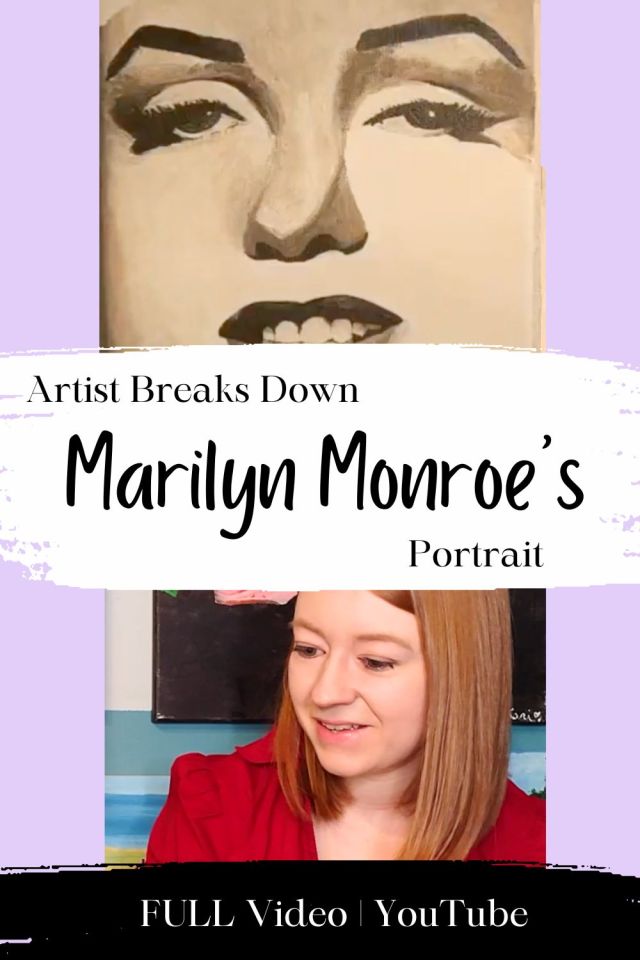
And I want to prove it to you… so, check out this full vlog-style video in which I explain thoroughly, with a time-lapse, how I re-created a famous photo of Marilyn Monroe in grayscale acrylic paints.
And, if you’re down to read some more about this portrait… here’s some additional tips!
Tips for Beginner Portrait Paintings
1. Use Your Reference Photo
As I mention in the video above, I always, always, ALWAYS use a reference photo when doing just about any painting. For portraits, though, it’s even more crucial. Because… long gone are the camera-less days of ye olde when people had to sit for 56 hours to have their portrait painted.
Using a reference photo, especially for beginners, is important because photos don’t move or change. And, if you really are adamant of doing things the old fashioned way with sit-down portraits… well, save that for later, and get some practice working off of photos first. Because you can best understand how light hits a subject in a photograph.
I also recommend using a reference photo to keep your portraits as realistic as possible. And, as the name implies—you have to reference that photo constantly. Check it every time you move from one area of your painting to the next, and use the photo as your “answer” to any and all questions you may have about your portrait. For example, if you don’t know quite where the highlights in your eyes need to be… “ask” your reference photo, and study where the light is in the eyes of the photo.
2. Start in Grayscale
Again, I mention this in the video talk-through, but I highly recommend beginning painters start doing portraits in black-and-white.
This is because, with a portrait in grayscale, you have far fewer colors to worry about. And, as we all know, people in our portraits can have so many different colors when it comes to hair, skin, eyes, clothes, etc. However, with a portrait in black-and-white… you only have a few variations of black, white, and gray to worry about.
By using grayscale paints, you can focus on practicing the highlighting and lowlighting in your portrait—not mixing colors over and over again until you get them right.
And, as an added tip here… use raw umber instead of black paint. Again, I said it in the video, but I’ll say it again, because black can turn blue sometimes when lightened up. With raw umber, you won’t have that problem, and raw umber is dark enough to resemble black in your painting (plus you can add some blue to it to make black as needed).
3. Focus on One Feature at a Time, in Order of Detail
Well, this may sound confusing, but another tip I have for beginners when it comes to portrait paintings is to focus on one facial feature at a time, and focus on each feature in order of “most complicated” to “least complicated.”
Basically, I’m trying to say that it’s best to work on the hardest parts first. Which, yes, can be quite intimidating… but, it’s better to put all your focus on the details before you fill in the larger areas. Or, at least, that’s my personal opinion—but I find that it works well!
So, for example, I like to work on parts of a portrait like this: eyes first, mouth second, nose third, then the rest of the facial skin.
Of course, each portrait is different, so you don’t have to stick to that order like it’s the ten commandments. However, that’s the order I typically stick to, and I recommend all beginners try it, too, so that they don’t feel overwhelmed by a blank canvas staring them down!
Now, that’s just a quick breakdown of how I painted Marilyn Monroe’s portrait, and I’ll be sure to come back with more tips for other paintings in the future. But, for now, if you enjoyed this breakdown, I really encourage you to check out my online painting platform, called Canvas Academy!
With Canvas Academy, you can learn to make tons of different paintings, with new classes added every month, and over 100 hours of class videos.
Canvas Academy is also home to popular painting courses, including a “Flowers & Petals” acrylic and watercolor course, a “Disney-Inspired” course, and a “Fruits & More” course. Check it out!
Now, until our next video breakdown…
–Kari

Pingback: Here’s How to Paint Pets Like a Pro – Kari Lynn M.