Everybody absolutely loves the look of watercolor flowers. After all, they can appear to pop off the page or canvas with vibrant colors that seamlessly flow into one another, and that’s something beautiful. But, then the other shoe drops because… well, admiring watercolor flowers is one thing, and making watercolor flowers is completely another!

Don’t fret, though, fellow painter—I’m here to help you perfect those pesky petals. Plus, as a professional painter myself, I have tons of tips to share to make your watercolor flowers even look more realistic.
First, though, let’s go over some common issues you may not even realize you’re having with your flowers!
Common Watercolor Flower Issues
1. Your Watercolors Aren’t “Flowing”
Watercolor can get us some beautiful results in our paintings… but, honestly, it’s not the easiest medium of paint to work with. Especially for beginners, watercolor can be difficult to master because it is such a transparent and, of course, watery material.

That being said, some beginners may struggle with getting the right consistency in their watercolor palettes before even putting paint to the page. Depending on the painting you are making, you may want to add a lot of water to your watercolor paints, or you may only want to add a tiny tinge. And, yeah, I know—figuring out how much water you need for your painting can feel impossible.
However, keep in mind that…
- High water content in your watercolors is great for filling in a painting’s background, filling in large flower petals, and adding a “base coat” of paint to any area before you add details on top
- Low water content in your watercolors is great for making details in your paintings, filling in small spaces with color, and creating richer, darker colors on the page
And it’s okay to play around with how much water is “a lot” versus how much is “a little” in your watercolors. Just experiment in order to get acquainted with your palette, and then you’ll get your watercolor flowing correctly!
2. You’re Not Working with Your Brush
Listen, artists: our brushes are versatile tools, and they are meant to be used in more than one way!
This is why, on our lil’ list here, we need to chat about how to work with and not against your paintbrush. Especially when working with watercolors, you need to feel comfortable in how you hold and maneuver your brush to get the right textures of paint on your page or canvas.
Since, as we said above, watercolor is very “flowy”, you may do well making watercolor flowers by letting the paint gently flow off of your brush. And this can mean a lot of different things to you–maybe it means you don’t press the brush very hard on the page, or maybe it means you saturate your brush with a lot of water content before you even begin a painting.
Again, some experimentation is probably going to be required on your part here, but there are some key tips to keep in mind to make sure you’re not working against your brush, like…
- Try to paint with the end of your brush “leading” the way
- Always leave some moisture on your brush while painting
- Never leave a brush sitting at the bottom of a cleaning cup–it can distort the bristols!
3. Too Much Water, Not Enough Color
And, while it’s important to use high water content or low water content (as said up above) in your watercolors, there are sometimes when we may over-add water to our palettes. With too high of a water content, your watercolors will appear too transparent on the page, making your hard work almost invisible.
Remember, it’s easier to add water to your watercolor palette than to take water away. So, try to add water in small increments, and test the transparency of your colors on a spare paper before applying them directly to your paintings.
Tips to Improve Your Watercolor Flowers
Now that we’ve gone over some issues that beginners often have with watercolor paints… let’s talk about all of the fun ways to actually improve the look of your flowers!
Layer Your Colors
One of the easiest ways (or so I’d like to think) to make your watercolor paintings look more “realistic” or “professional” is by adding layers on layers of paint. Specifically, it helps to add layers on top of layers that are already dry in your paintings. So, it may add some extra drying time to your painting sessions, but this is a great method to play around with!
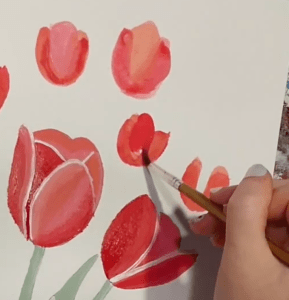
With flowers, we can layer our paints most on the petals, where there are the most colors and details typically in a real flower. The more layers you add, too, the more vibrant your colors will appear in your painting. That’s because (remember!) watercolor paints are highly transparent, but layering one level of transparency on top of another makes things less transparent overall.

Use Multiple Different Colors
Along with layering your watercolors, make sure you’re actually using a wide range of colors in your flower paintings. And, if you’re thinking, “well, don’t I just paint a red rose red and that’s it?”… well, here’s the scoop.

Take a look at a photograph of a real flower–any flower. Now, look really, really closely at the petals of the flower, from the outside ones to the ones closest to the flower’s center. Even if it is a red rose, there are actually many, many variations of red (and maybe other colors, like dark pink or brown) in the petals.
So, to make your floral paintings look as realistic as possible, you’ll want to re-create as many colors as possible that you see in real flowers. Even if you aren’t using a reference picture for your painting, try to grab and mix up as many versions of colors as you can that would be naturally occurring in the flower you want to create.
Test Out Different Textures
While watercolor paint is quite “flat”, meaning it isn’t a thick paint that can be built-up 3-dimensionally, you can still make it look more 3-D. To do this, play around with the way you move your brush on the page, creating different types of brushstrokes.
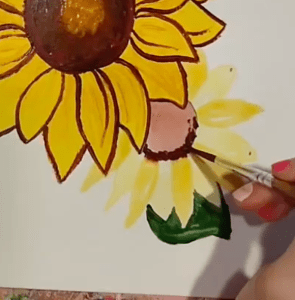
For the petals on flowers, it’s typically good to use long, controlled brushstrokes. For the centers of some flowers, you may “dab” your paintbrush to make some bumpy-like textures. In your backgrounds, try a combination of both long and choppy strokes.
Practice Before Puttin’ It Down in Paint
Watercolor is a tricky paint because, since it’s so transparent, it can’t easily be used to cover up mistakes in your paintings. And, while mistakes are always okay, you can always minimize them by practicing the flowers you want to paint before putting them down more permanently on your canvas or other painting surface.
Practicing with watercolors is best on watercolor paper, canvas paper, or cardstock paper, but you can always practice on regular notebook or printer paper if that’s all you’ve got laying around. Thinner papers tend to wrinkle with watercolors, but that’s totally fine just for a practice round!
Practice Further with an Online Class
All levels of painters can improve their painting techniques just with regular practice. And, if you’re looking for a way to build that practice time into your personal schedule, consider taking some on-demand painting classes online that go wherever you go!
If you’d like to specifically practice and learn more tips about watercolor flowers, then this painting course by Canvas Academy is perfect for you. In the course, you’ll not only learn how to paint with watercolors, but you’ll get the chance to practice making flowers with acrylic paints, too.
Some of the flowers you can learn to make in the course include:
Now, go forth, fellow painters, and create your next beautiful work of watercolor art!
–Kari


Pingback: How to Master Flowers with Acrylic Paint – Kari Lynn M.