Hey there, fellow artist!
Welcome to a super-duper useful blog post in which we will go over how to create “lowlights” in any painting you create. Lowlights go hand-in-hand with highlights, which we covered in a previous post as well.
When used in conjunction with highlights, lowlights, or areas of perceived “darkness” in a painting, can create a three-dimensional, realistic-looking picture. Highlights and lowlights create value in a painting, and value is one of the main elements of art.
Bottom line, folks—if you want your paintings to look real, then try adding lowlights to them!
Plus, there are actually five ways to make lowlights in any given painting, which is more than the two ways we use to make highlights. So, making lowlights is a little more complex than making highlights, but there are a few ways that are a bit easier for beginners than the others.
But, First, a Note on Mixing
Before we dive deep into all of the methods of creating lowlights, let’s chat for a quick moment about how to physically add lowlights to your paintings. Because, with lowlights, a little can go a long way, so it’s always better to add too little to your canvas than too much.
Each of the methods listed below utilize what I personally like to call “darkeners” to make lowlights, meaning they are used to darken other colors. This is just like how we can call white paint a “lightener” because it lightens colors to make highlights.
So, no matter what “darkener” you use, you’ll want to mix it with the color you’re trying to darken on your painting palette first. You can also just apply the darkener directly to your canvas, but I wouldn’t recommend doing this as a beginner since that makes it difficult to control how dark your lowlights will be.
As you mix your darkener and whatever color you’re making into a lowlight, be sure to add small amounts of your darkener at a time because, like we already said, a little goes a long way. Remember that you, as the artist, are in control of how dark your lowlights should be—so take your time to “build up” the darkness before you apply it to your canvas. That way, you’ll avoid making mistakes that will difficult to cover up!
The 2 Easiest Ways to Make Lowlights
If you’re new to painting or just prefer to keep things simple while you paint, try these two easy methods to creating lowlights. They require some tubes of paint that you may not have right on-hand, but I highly recommend investing in these paint colors to make your life easier.
#1: With “Raw Umber”
Raw umber is, actually, a common paint color that is typically available at any paint or craft store (Hobby Lobby, anyone?)—although you may not have known why artists use it.

Remember, this is one of our “darkeners”, so it’s meant to darken other colors in your paintings. It can also be used as a regular color on its own, but its main purpose is to be a darkener.
However, here’s what you need to know about raw umber: it’s a “cool color” darkener.
Now, assuming you’re scratching your head right now and yelling, “What!” at your screen… let me explain further.
Raw umber is a darkener, but it works best at darkening cool colors. And, if you didn’t know, cool colors are those that are more closely related to blue on the color wheel. Remember—our friend the color wheel is an important part of color theory, and you should be very familiar with it if you want to continue learning and growing as a painter!

So, when you want to use raw umber to create lowlights, know that you typically should use it to darken cool colors in your paintings. These colors include blue, green, purple… and sometimes (but less commonly) yellow. Yellow is actually very finicky when it comes to painting, so we will have a word about it down below separately.
#2: With “Burnt Umber”
Now, using raw umber is a great way to add some lowlights to our paintings… but it works best with cool colors, so we need something else to work with the opposite hues on the color wheel. And we’re talking about, of course, warm colors.

Burnt umber is another common paint color that you’ll find in tubes and palettes in the craft store, and it’s very useful for darkening those warm tones in your paintings. Typically, the warm tones will be those most closely related to red.
Burnt umber, then, works best at darkening down colors like red, orange, and, sometimes, yellow (again, though, we’ll chat further about yellow below).
A Quick Word on Yellow
Well, we discussed cool colors working best with raw umber and warm colors working best with burnt umber when it comes to making lowlights. But… we also happened to mention the color yellow in both methods, didn’t we?
And… you’re probably very confused about it, and you’re totally not alone.
Because yellow, fellow painters, is a very tricky color to work with. It’s a primary color (as we’ve learned through color theory), and it sits right between red and blue, our other two primary colors, on the color wheel. So… is it a warm color or a cool color?
Generally, most people would classify yellow as a warm color because it appears “warm” in tone like red does. However… that doesn’t mean that it always acts like a warm color in our paintings… just like some of us don’t always act our own age, right?
So, actually, when we want to make a lowlight out of yellow in a painting, we can use either raw umber or burnt umber to make that lowlight happen. And, as I like to tell students, making a yellow lowlight with burnt umber will make a more golden yellow while making a yellow lowlight with raw umber will make a more “dirty” yellow. Which, of course, may be confusing in itself, I know.
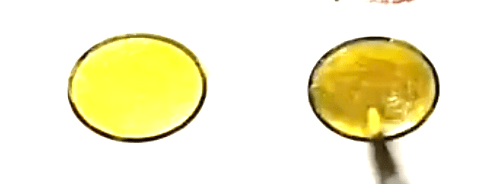
However, the best way to determine whether you need to use burnt umber or raw umber with yellow in your picture is by looking closely at your reference photo, if you have one. What do the yellow lowlights in your photo naturally look like—more “golden” or more “dirty”? If you can’t tell, try mixing yellow once with raw umber and then once with burnt umber on your painting palette—from there, you can compare the two options before applying one to your canvas.
Working with yellow is a difficult skill to master, too, so give yourself grace as you try making those yellow lowlights!
The 3 Additional Ways to Make Lowlights
Some other methods for creating lowlights are available for you to use, too. However, these methods are trickier to master, so they’re not ideal for beginning painters.
#3: With Black or Gray
Now, raw umber is essentially a form of very dark gray paint, so, technically, you could replace it with another dark gray paint as needed. This may make it difficult to control the lowlights you get, though, but it’s a nice alternative to know when you don’t have any raw umber on hand. Just like with raw umber, however, you should only use gray as a darkener for cool colors to get the best results.
Another way to create lowlights in your paintings is by adding black paint to a color. This logically makes sense because, if we know that adding white to any color will lighten it, then adding black should darken it, too. However, this logic doesn’t always apply to every color in the painting world because black paints are made with blue undertones—so, again, this works best with cool colors only.
#4: With Brown
Just like how raw umber is a type of gray paint, burnt umber is actually a type of brown paint. So, you can usually replace burnt umber with brown when you want to create lowlights for a warm color. Just use it like you would burnt umber!
Even though I always encourage beginning painters to use raw umber and burnt umber as their darkeners, I know that accessing those paints isn’t always possible. That’s why I like to give students alternative options to use paints like gray, black, and brown in the painting classes I teach online. Because, even though it’s not ideal, it still works well when you need to get some simple painting practice in.
#5: With a Color’s Complement
Lastly, there is a way to actually make lowlights in a painting without using anything other than the three primary tubes of paint: red, blue, and yellow. And it’s the most complicated method… but, it still works, and it’s by using your knowledge of complementary colors.
Again, if you know your color wheel well, then you can actually use your knowledge of the wheel to find two complementary colors—that is, colors that sit completely opposite one another on the wheel. And, according to color theory, mixing those two colors together in equal amounts should result in a dark gray tone. Mixing a smaller amount of a color’s complement to it, then, results in a darker tone of the original color—making it a great method for making lowlights.
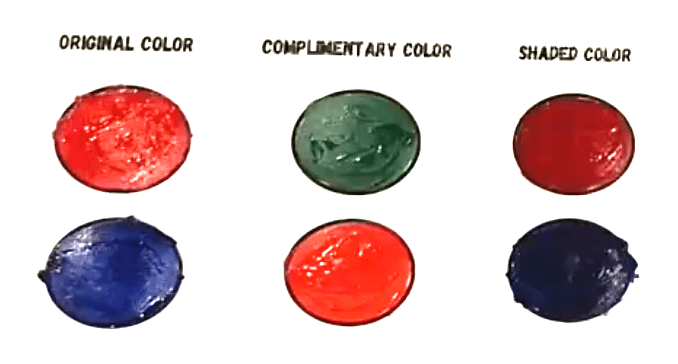
Some artists prefer making lowlights with this method because it eliminates the need to have extra paint tubes, like raw umber, burnt umber, black, etc., on hand. However, using this method takes a lot of practice, and it requires you to follow the rules of color theory to a T.
In all of the online painting classes I offer, I stick to teaching you how to make magnificent paintings with lowlights created by using raw umber and burnt umber. However, I always give you alternative options to kind of “choose your own adventure”, so you get creative freedom in each class.
Check out all of the classes I offer on my online learning platform, Canvas Academy, and dive deeper into making lowlights while you create stunning works of art, one step at a time!
Also available on Canvas Academy is a full “Basics” painting course, which helps you understand concepts like value, blending, color theory, brush technique, and so much more. Most classes in the course include downloadable and printable workbooks, too, so you can practice your painting techniques as we go.
Now, go forth, fellow artist, and enjoy adding lowlights and depth to your future paintings.
–Kari

Pingback: How to Master Flowers with Acrylic Paint – Kari Lynn M.
Pingback: How to Paint Realistic Fruits & Still-Life Pictures – Kari Lynn M.